
Welcome to July!!! Finally it’s warm and we are ready to go outside!!! It’s also a great time to paint and spruce up the joint!! But wait a minute! Let’s look at those walls……are they in great shape? Ooops, there’s a ding where Tommy’s Tonka truck flew off the table (by mistake) and hit the wall! Oh no, remember when your movers brought in that new bedroom set and hit the wall? Oh oh, the hole in the wall is still behind that recliner? Or, for goodness sake, the door slammed open by itself and put a hole in the wall? Well, now you can’t just paint over that stuff. Let’s fix it. With this warm weather it will all dry in no time and then you can paint!
The techniques we will use today are specific to wallboard, not plaster. You will need different materials for plaster. Unlike plaster, drywall compounds stick readily to painted surfaces and that means you can repair directly over paint. After the patch has dried you will be able to paint right over it. We will work today on large holes, rather than dings or expansion cracks.
Tools:
Framing square
Screwgun
Putty knife
Drywall hopper or gun
Compressor
Razor knife
Materials:
Drywall screws (Size dependent upon your drywall thickness- 1 1/4” are typical)
Drywall
Spackling
Joint tape
Drywall compound
Drywall nails
Cardboard, String
Drywall backer strips
Safety tips:
Not too much danger with this project!
Be safe with the razor knife, cut away from you.
Lay plastic or paper on the flooring under the repairs. Compounds are difficult to get out of carpets.
So let’s get to it! Ready?
Option 1: For Holes larger than 4” square
Step 1: With your framing square, draw an outline around the damaged area. With your razor knife, cutaway the damaged section of drywall. Be sure you have a square hole to work with.
Step 2: Cut 2 strips from 3/4”plywood or furring to make your backer board. Install the strips with your screwgun and 1 ¼” screws to the inside of the hole in the wall. This will give your new piece of drywall something to screw to.
Step 3: Cut a piece of drywall to the size of the hole. This drywall will need to fit inside the hole you have cut. Screw it into the four corners where you added your backer strips.
Step 4: Cut and apply adhesive backed fiberglass drywall tape to the four edges of your hole. This will be applied on the existing wall and the new board to cover the joints. Apply a thin coat of drywall compound to the joints. Let it dry.
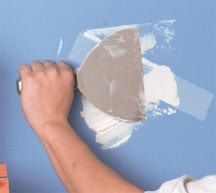
Step 5: Sand the area and repeat if you need a smoother finish. Try to keep it as smooth as possible for a better painted finish.
Option 2: This is a very handy tip for holes no larger than 3”!!!
Step 1: Cut a piece of cardboard about 1” larger than the hole you are patching. Poke a hole into the middle of cardboard with a small screwdriver or drywall screw. Using the string or twine, tie a knot in the end, cut into a 12’ section and push through the cardboard.
Step 2: Fold the cardboard loosely in half. Holding onto the string, push the folded cardboard into the hole and pull it back tight against the drywall. This cardboard will act as a backer for your spackle. Hold onto the string until you get good adhesion from your spackle.
Step 3: Using your putty knife, fill the hole with spackle. As it dries, this spackle will sink up a bit. You will need to apply several levels of spackle until the hole is flush with the existing drywall. Be sure each application has dried before you apply the next.
Step 4: Once the spackle has completely dried and your hole is as flush with the drywall as possible, snip the string off as close to the patch as you can. Sand the patch until you have a smooth finish.

You are now ready to texture your patches. There are several different drywall patterns and you will have to match yours. This may be trial and error, but do the best you can. The most popular are orangepeel (which looks like its’ namesake) or knockdown, which has flattened areas throughout the texture.
If the damage you were repairing were large holes, you may need to rent a drywall gun and compressor at your favorite rental yard (don’t forget about us! We have two!!!) With this gun, the spray is adjustable, so you should get a close match to the pattern you have! It is user friendly and you are able to practice on a piece of drywall or wood which you don’t need.
You can also purchase a can or two of spray texture at your hardware store. This texture is sold in two sizes, large or small. Buy what you need, because it doesn’t last long after you use it. You can buy either orangepeel or knockdown, whichever suits your needs.
Once you have sprayed your texture and given it time to dry, you will need to do a light sanding with a 100 or 120 grit paper to give it a finished look. Brush off the dust and voila, you are ready to paint with the original color or put a fresh new color on those walls.
Stand back and admire the work you have just done…….can you believe how handy you have become?? Well, all this talk about work and orangepeel, has made me thirsty. A tall, cold glass of orange juice sounds just right!!!
You can always call us for any of your rental or repair needs @ 530-832-5462! Remember J’s got you covered!!!


