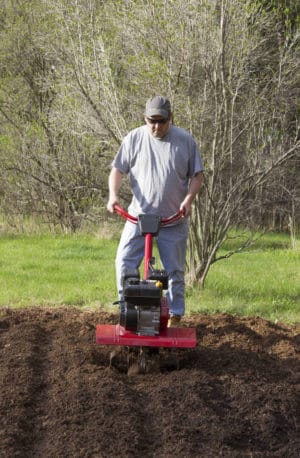
ROTOTILLING A GARDEN BEDHere we are!!!! Welcome back SPRING!!! Visions of green, flowers of all colors and fresh, delicious fruits and vegetables dance in my head!! So now, let’s put away those winter snow toys and shift gears.If we are going to bring it to life after the winter, we will need to prep the ground. How do we get that soil in tip top shape for that wonderful garden you have been dreaming about!!??We will start by creating a perfect garden plot! Think about where your garden will be and how large it will be. Then think about your tiller size. They range from a 2 hp cultivator to a tractor driven option. Choose the size which is suitable for the size of your garden and we will start!!Using a rototiller will make the soil preparation sooo much easier for you. The whole dynamics of this equipment is simple. Rotating blades are designed to break up the soil. They will also decrease the possibility of the compaction of your precious topsoil. Turning the dirt over, getting rid of weeds, big & small, and aeration of the soil are only a few of the advantages to using a tiller. One of your biggest advantages is, of course, a less labor intensive project.Tools:*Rototiller to suit the size of your garden*Rake*Fuel*Compost/manureSafety tips:*Always, always (Mom lecture #1) wear safe shoes and clothing when using equipment*Wear protective eye-wear. Safety glasses are best, but at the minimum wear sunglasses*Wear gloves, something lighter weight will give you more dexterity.*Whether you rent your equipment (wink, wink) or have your own, ALWAYS PAY ATTENTION to the instructions and follow them.*Keep children and pets away from the rototiller.Handy tips:*Tilling will kill adult weeds, but sudden sunlight to the seeds buried beneath the soil may encourage those dormant seeds to start growing! This discovery has been made by the Agricultural Research Service!! Go figure!! They encourage tilling farmland at night because it may help decrease the growth of some weeds by 50 to 80 percent!!!*Working with lightly dampened soil is acceptable, however do not till after multiple rainy days as that soil will be too wet. Wet soil may actually compact with your weight plus the rototiller.*Work on a calm day as opposed to a breezy day. You may lose a lot of topsoil to the wind if you don’t watch the weather.*Experts warn to watch your digging depth. Deep tilling occurs when you make three or more passes with a rototiller set at the deepest level. This will “pulverize” the soil, resulting in the destruction of beneficial organisms in the soil.*When tilling in the spring, you will want to add manure or compost over the soil. Start by tilling the soil in one direction to break up the ground. Add the amendments. Till again in the opposite direction. This will ensure the additives are worked into the soil and will create a fertile area for those seeds! Tilling in the fall, by the way, requires different soil additives, so be aware of what you use each season.Step 1: Choose a time when the soil is not overly wet. It should be damp enough to compact, but crumbly if you press it. Since we are now in the spring, rototill approximately 3 weeks before planting time. Fall rototilling tips are different and we may get to those rules later this year!Step 2: Take a quick walk through the area you are going to rototill. Look for hidden items which could damage the blades or hurt the gardener: barbed or other wire, broken pots or metal items. You can quickly run the rake through this area. It takes a bit of time, yes, but an ounce of prevention…….Step 3: By now you should have checked to be sure your tiller is full of fuel. Also make sure you have another party there if you have never used a tiller before. It takes a bit of upper and lower body strength to maneuver this piece of equipment. Try it before you get to the fun part!Step 4: You are ready to till that garden!! There is really no set direction in which to run the tiller at first. Just take it slow, moving the rototiller through the selected area and make sure you have broken up all the hardened areas. Once you have the whole area broken up lightly, if your tiller can, change to a deeper setting and go over the whole area again. When you are comfortable with the results you have achieved, turn off the tiller and set aside.Step 5: You are now ready to compost. Spread a 2” – 3” layer evenly over the area. Lightly rake this over the entire surface of the garden.Step 6: Set your tiller to the lighter setting and work the area once more. This time you are working the compost deeper into the softened soil. Be sure to run the tiller in the opposite direction than before for maximum efficiency.Once you have tilled your area, wait approximately three weeks and you are ready to plant!! The possibilities are endless. The veggies and flowers are just waiting for you, Mother Earth to set them free!!!! Now with your TLC, sunshine and water you are the creator of your own paradise!!! And when it comes time to harvest some of those goodies, don’t forget about me!!!! The door is always open at J’s Feather River Rental in Portola!!!You can call us at 530-832-5462. we will answer any questions you may have. Or just come by to visit! See you next time!!!
Toolin’ Around With J

[adrotate group="14"]


